I "heart" my extraordinarily creative friends -- you will too when you visit them!

Thursday, July 10, 2014

Chalk it Up!

I am not sure whether I had more fun emptying these bottles, or painting, beading, wire wrapping, and decorating them. It was a grand project in any event.


Some folks have asked how these were made. Here are the three easy steps -- number 1 being the hardest:


1. Empty a bottle, clean thoroughly, and dry completely.

2. Apply many coats (4 or 5) of chalkboard paint on the bottle, allowing at least a day of cure time between coats.  I used regular paint but I am sure spray chalkboard paint would work just as well.

3. Season your new "chalk board" by completely covering it with chalk and then wiping it off.


This is really as far as you need to take it -- but those of you who know me, know that that wasn't quite enough. I created beaded and wrapped wire tops on the cork stoppers, made a lanyard and wire holder for a piece of chalk, and a bitty eraser that hides in the bottom hollow.


Super simple -- anyone can do it!!

So don't "wine" to me if you can't find a place to use your chalk.

Sunday, January 12, 2014

Mug Rugs

Click to participate
I love this new (at least new to me) concept of "mug rugs."  Better than a coaster ever thought of being because it can hold a little delicacy to go along with your cuppa. My first batch is nearly all gone with the gifting season just past so I was delighted to see another opportunity to make more.  Thanks to facebook and my facebook and real-time friend, Judy, I am "called" to participate in a mug rug swap.  I'm signed up and am anxious to make a trade and make a new friend.  It's not too late for you to put your name on the list. Hope I get to trade with you!!

Wednesday, January 1, 2014

Cowboy Bear


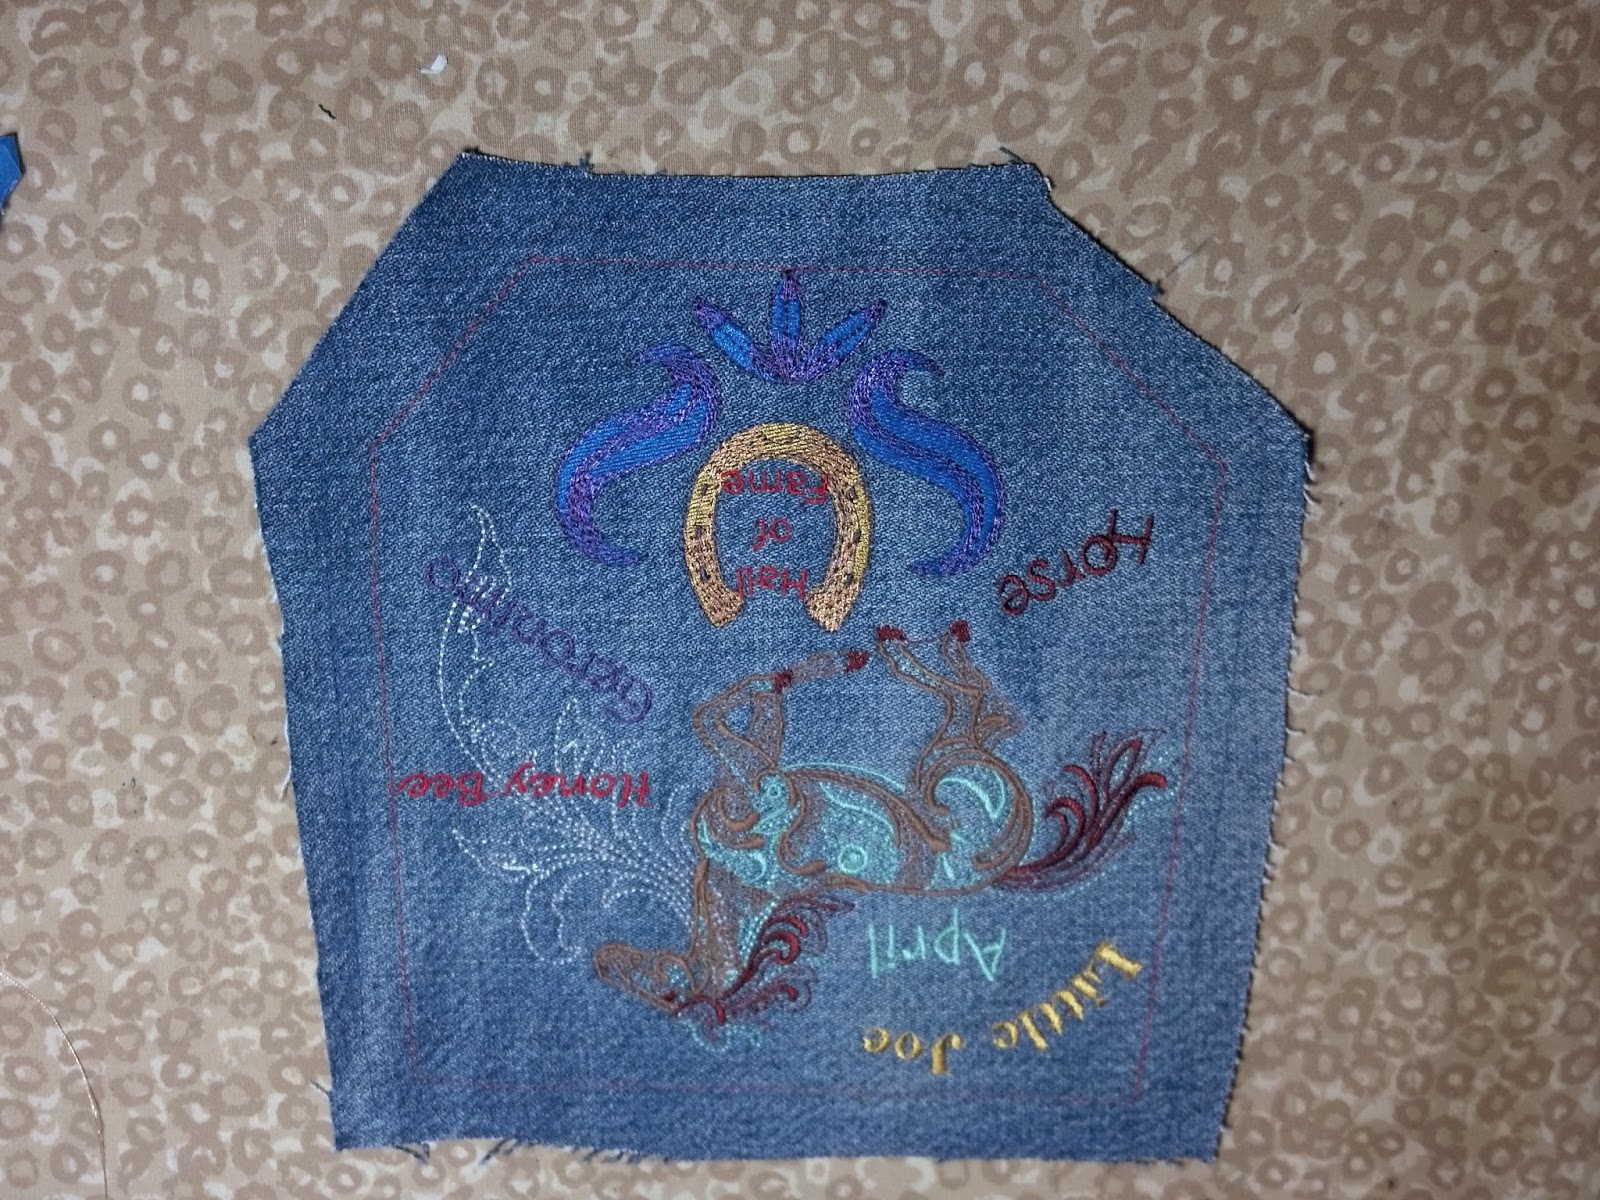
My daughters are grown but I think there is always a little child within (at least I still love teddy bears) and so I made special memory teddy bears for Christmas this year. These were made from the girls' Dad's Wranglers and each features pockets as the main part of the body.  Each front and back piece of the teddy bear --face, ears, legs, arms, and body were machine embroidered with special meaning.  

"Cowboy Bear", dated and labeled for Rikke, (daughter number 2) our horsewoman, sports retro western designs as well as the names of all the horses she has owned. Cowboy Bear has silver buttons for spurs and the silver neck slide is from one of her Dad's western belts. Button eyes are from Granny's button box. The final act in completion, was to sew on a button heart which I gave a kiss to breathe life into Cowboy Bear.  If you look closely, you can see one of Rikke's horses looking over the fence -- that's Geronimo!  Below are several other views of Cowboy Bear.  

Cowboy Back

Cowboy Arm
As you can see, Cowboy Bear, is right at home in the pasture, alongside Rikke's favorite ride, Sunnyside Olena.


To see all of Cowboy Bear's designs click here

Sunday, December 29, 2013

Christmas Wrapping Bagged!!


A favorite internet haunt for me is Urban Threads.  When Urban Threads presented a Christmas Countdown this year, design number one --"Painted Reindeer" -- became my inspiration to continue throughout the countdown series to create very individual and unique gift bags for our family.  (All but one of the designs are from Urban Threads.)  The best part of this project aside from the great designs was I had everything I needed to complete these in my sewing room.

Despite comments from the family that the bag itself was a gift without any contents, I had filled them to the brim with all of those things I would have had to wrap.  Ahh, but to the disappointment of the family, I requested that the bags remain with me for refilling next year.  

This project comprised many hours of machine embroidery and the bag construction conducted assembly line fashion was completed on my lovely little Bernice (Bernina) who traveled with me on vacation.  

The bag design with some slight variation was patterned after this Sew4home projectThanks to Sew4Home and Urban Threads my Christmas wrapping for next year will be a "in the bag."  


Cheers!
  my hand

Thursday, December 12, 2013

The Fire Extinguisher Project


Being in the Fire Equipment Business has been very rewarding knowing that we are helpiing the community to be prepared in the event of fires.  While doing all of this, there comes a time when some fire extinguishers are required to be retired from "active" service.  In that regard, we have found a new place in the home for those veteran fire extinguishers as seen here in these samples of their new life.  It might be called a labor of love as they are rather labor intensive but the results are fabulous -- don't you think?

my hand

Sunday, July 21, 2013

Decoupaging With Princess


Princess, aka "rat dog" serving as my expediter, and my DD#1 (Sharla) for inspiration, I joined in with my brush in the Modge Podge while Sharla was making her Dad's Birthday Bank Money up in Smoke (post below) to do a wooden frame makeover using scrips and scraps of sheet music and my calligraphy practice. 


I became a little over zealous and did the back of the frame too -- call it serendipity when I added "Life is too short to dance with ugly men." with no idea that the photo I would choose to put in this frame would be a dance with my DH.

 
Though Princess did a great job of paper shredding we thought it wise not to offer her any glue for her "project."  Creativity is in the eye of the doer?


my hand

Thursday, July 18, 2013

Money up in Smoke

My DH's (Jerry's) favorite part of the day is when he can light his cigar.  The kids are always trying to find that perfect cigar for him and have spent a lot of money in that quest but he always goes back to his favorite Cigar Warehouse for his "personal label." 

So, now that it is time for another birthday, I suggested that instead of buying a cigar, why not create a cigar bank in which to deposit funds for him to go buy his own cigars.


Our oldest daughter, Sharla, implemented this idea by decoupaging an old wooden cigar box with reproduction antique cigar labels.  She and her siblings filled it with money and though it will still go up in smoke, it will go up in Jerry's favorite smoke!!!!


my hand

Saturday, June 29, 2013

Good Morning Sunshine


Who wouldn't be cheered upon entry to the kitchen to be met with a cook wearing this apron?  This is indeed a happy morning greeting and a lovely redwork motif from the Embroidery Library.  I designed this apron for a special friend and I can't wait to see her wear it as she makes one of her favorite breakfast dishes -- Eggs!

Wednesday, June 12, 2013

Talavera Purse

Instead of working on one of many, many unfinished projects, what do I do when walking by a pile of denim jean scraps in my sewing room?  Yet another light bulb turned on in a burst of light in my chandelier head to create something new from something old.  

This was practically ready-made --with just a few hours of engineering to get the look I wanted. 

Before I could get the lining (with elastic pouch pocket) and ring tab to hold a set of keys sewn into it, my middle daughter had a hold of it and wouldn't let go.  It will make its premier showing tomorrow as we travel on vacation. 

The talavera embroidery design is from the Embroidery Library with a few crystals on the body for a little sparkly.  The strap is a belt left completely intact with the silver rings. These can be used to hold a scarf or as another way to carry the purse.

I still have the other half of the jeans -- so maybe I'll get a purse too -- unless my other daughter sees what I am making.  

Update -- I am delighted that the Embroidery Library posted this project on their facebook page resulting in 143 Likes; 9 comments, and 20 shares -- and 266 views on my blog! 


Sunday, May 12, 2013

Flight of Imagination

I just love this embroidery design called "Flight of Imagination" from Urban Threads.  http://urbanthreads.com.  Dain and I collaborated on the colors in this design working towards a vintage look with the design embroidered on a coarse linen backed with light-weight batting and a field of fill design for the look of Aida Cloth.  Framed, this will be a great addition to my studio wall.  A great reminder that my imagination is always in flight.

 my hand

Wednesday, May 8, 2013

Spirit of the Moment

May Baskets have all been delivered and the promise of a very warm spring is here in the "Valley of the Sun."  Another fully too long hiatus has brought me back into the fold to reunite with my blogging buddies with a new banner and my latest show and tell. 
A little mini quilt in preparation of Memorial Day created on my lovely little 380 Bernina and the help of my friendly teacher and project designer, Denise, at Sew From the Heart.  It is called a "table top quilt" and is designed with a flap on the back to slip over an upright plastic sign holder.  A great little project that inspires to create other seasonal versions so that the "sign" will convey the spirit of the moment.  The star was cut with a Go Cutter -- I am hopeful that I can enlist my Sizzix to do the same thing.  Another reason to have a "laundry room" full of 'tools."


And, if I had paid attention in class, I would have known to cut my binding at 2 1/2" instead of 1 1/2" and it would have been a lot less trouble.  But, I love a challenge.  What next will be the spirit of the moment?  I know Denise has some ideas.....


Friday, January 11, 2013

Happy New Year

My list just gets bigger and bigger every year!  There are so many talented paper crafters out there that stimulate, inspire, and encourage the rest of us to continue cutting, embossing, stippling, and curling paper that it could be a full time activity just visiting their beautiful blogs and websites.  But, of course, we all have the "need" and desire to make our own stuff so hence, my BIG list.  Paper arts notwithstanding, I still enjoy crochet, and am immersed in sewing as well as many other art-related activities.  Despite the fact that I live in a warm climate, this time of year provokes an attitude or sense of cold weather so I have launched into a crochet project to make afghans for my two grandchildren.  Just to let you know what I am up to and to promise that new cards and card challenges are also on their way to this blog.

Happy New Year and Happy Crafting!


my hand

Thursday, December 6, 2012

Rock Star

Rowlf  -- the Muppet pianist (Inkadinkadoo) was perfect for a musician and song writer friend of mine.  Rowlf is a three layer dimensional and lifted with foam mounts on top of the piano keys.  Accents are a red gem for a cufflink my handSizzix die cut stars from sparkly fun foam (a new discovery from visiting my blogging stamping friend Sue Drees), a Sizzlet guitar and DP from stash.  The background for Rowlf was direct to paper - die cut panels from Nestabilities, "Rock Star" by Hampton Arts (Michael's Dollar stamp). 

Saturday, December 1, 2012

Joy

Joy to the World!  When I began this card for Stampin' Sisters in Christ's last challenge to make a Christmas Card the word "Joy" kept resounding in my mind and all week long, fussed in the laundry room with how to put Joy in my card. I wanted to make a very special card in honor of the Stampin' Sisters in Christ closing so I went with "sparkly" because this challenge blog has been full of joy and sparkly and an inspiration to all of us.  Thanks Stampin' Sisters for a great run.  And, thanks to Spellbinders, Sizzix, Bernina, and Martha Stewart for giving me the tools to make some Joy.
my hand

Wednesday, November 28, 2012

Coco Chanel

"Ink it Up Finally..." Challenge 44:  Use It Tuesday challenges us to find and use an uninked stamp -- Ho Ho -- that's an easy one for me!!  I have shelves and drawers full and could create endless projects if I didn't have to do the laundry once in awhile.
I adore this Paula Best Coco Chanel image/quote that was obtained at a stamp convention about four years ago.  "Nature gives you the face you have a twenty it is up to you to merit the face you have at fifty."  The backdrop is stitched with my DGD's Bernette sewing machine from scraps on my workbench, the medallion issues from the same scraps.  More "Use it" Stuff -- surely five years ago, I made a flock or swarm (?) of these dragonflies with a PSX stamp, embossing powder, and aluminum from a soda can.  They were just "refound" and provided a perfect accent for this card. Wishing for you a face that you merit at 50 (ala Coco Chanel).

Friday, November 23, 2012

It's Your Day....

Stampin' Sisters in Christ challenge this week is to create a card for a child.  I've had this little fisherman for quite a few years just sitting in the drawer waiting for an opportunity to ink up -- and he was just right for the job.  This diorama has three layers of different lengths -- the longest layer is the back with a mountain range, the middle layer (second longest) is water and a trout jumping up and the first layer (shortest) is the focal point and message.  When fastened together, it creates arcs so that the card is free standing.  I purposely used large paper fasteners instead of small brads for assembly as it will be mailed flat and little hands will be putting it together.


Inspiration from Sandy Genovese's book "Pop-Up Cards and other greetings that Slide, Dangle &  Move".- page 76
.Stuff I used:  Azadi Earles All Night Media, and Darcie's, Martha Stewart border punch, Sizzix, Cuttlebug embossing folder, prismacolors, and glitter.

my hand

Monday, November 19, 2012

A Purrrfect Thank You

With Thanksgiving just around the corner, thank you cards are a favorite challenge theme this month. I am meeting the challenge with this card by posting at Pause, Dream, Enjoy -- Simon Says Stamp Challenge -- Papercraft Star Challenge 121

A Sizzix die cut embellishment attaches the Delafield cat image (one of my very first stamps!!) and still a favorite.  The image was stamped and  colored on the reverse side of vellum and mounted on cardstock, before matting with another layer and then silk leaves and a ribbon from stash for the finish.  The Hero Arts "Thank You" was punched out with an Emagination tag punch.  And speaking of Thank yous -- I wish to thank you for stopping by - please let me know what you think. 

my hand